
BlogBackcountryOvernight Winter Trips: Learn Winter Camping
Overnight Winter Trips: Learn Winter Camping
Richard Campbell
Dec 2, 2022
Richard is the Founder of 10Adventures, and as a writer shares his experience from 30+ years exploring the world by foot, bike, ski, and boat.
After you’ve become comfortable with day trips in the winter and have done summer backpacks, it’s time to venture into the realm of overnighting in the winter. So what’s different about winter camping? Let’s break it down…
Winter Travel Mode
Mode of travel. Snow complicates your ability to travel greatly. There are three basic means of travelling in the backcountry in the mountains:
- Skis. Alpine touring skis are the most efficient and effective way to move about on snow. They offer the most floatation, and can be incredibly fun on descents. There are numerous downsides to skiing. First is cost. It’s not hard to spend north of $2K on a basic backcountry ski rig. Second is the time, money and energy needed to become a competent skier, especially if you’re not a skier already. Lastly, skiing does have a “bro” culture that can be intimidating to newcomers.
- Snowshoes, aka slowshoes. Snowshoes don’t float nearly as well as skis and therefore consume a lot more time and energy to move the same distance. They cost a small fraction of what skis do, and require no training or special skills. A couple hundred bucks for a good pair of snowshoes and you’re on your way.
- Boot alone. This is a terrible way to travel in the backcountry, other than on packed trails. Progress will be slow and exhausting.


Winter Shelters
Okay, so we’ve decided on a way to move around. Next is shelter. There are three main types of winter shelters:
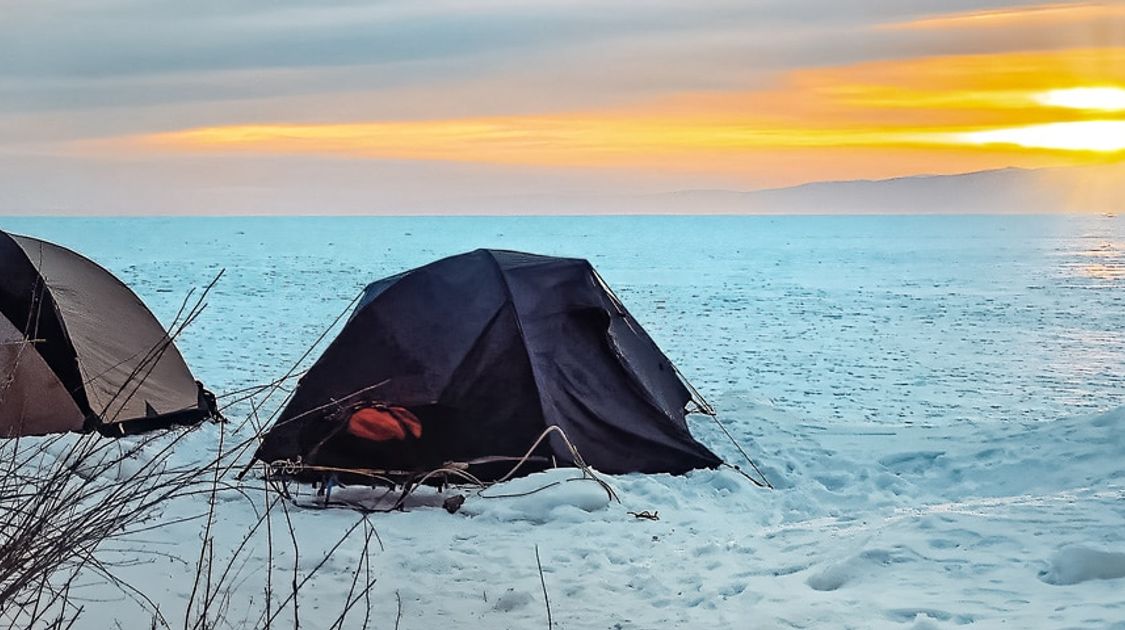
- Tents. Many people ask if it’s possible to use their summer backcountry tent. It is, but you will need to be careful about where you camp. Most summer tents can’t handle a large snow load and will let high winds blow snow under the fly and through the mesh. They also don’t trap any heat, so your sleeping gear will have to cope with the outside temperatures. If you take care to camp in sheltered places, a summer-style tent will easily work. A four season tent will have much stronger construction, solid walls that trap heat and keep out spindrift, as well as a fly that extends closer to the ground for weather protection. They’re heavier to carry and usually cost more than summer tents.
- Tarps. These work great as a cooking shelter in addition to a tent. Though it can also be adapted to work as a sleeping/cooking shelter to save weight. Note that tarps have some huge compromises: you have no floor, so your gear needs to work being on snow. They also don’t breathe, so you can end up with a lot of condensation in the form of ice/snow that blizzards down on you.
- Snow shelters. This includes structures, like snow caves. They can be dark and damp, but they’re also warm and quiet, and in a -30C howling blizzard, the temperature and low wind noise can be a welcomed respite. They require a lot of calories to build and like tarps, you’re on the snow, plus dealing with dripping walls. The most important thing to remember about snow caves is that you can die from carbon monoxide poisoning much easier than other types of shelters.

Sunset through trees cozy winter camping trip
Winter Sleeping Bags
The most important part of your winter sleeping system is your sleeping pad. You can have a $1200 sleeping bag and if your pad isn’t up to snuff, you’ll be cold. Really cold. A pad with an R value of 4 will work, but the closer you are to 6 or more, the better.

Campfire from the tent keeping warm winter camping hiking
Winter Camping Cooking Gear
One other important piece of gear is a stove to ensure you can enjoy a warm meal at the end of your day. There are two types of stoves you can use, and they both have their pluses and minuses.
- White gas. This is the family of stoves like the MSR Whisperlite, Dragonfly and XGK. There’s no stove that’s more of a workhorse for winter trips. It will roar away melting snow for hours on end at -40C. The downsides of white gas stoves include the fact that they are heavy, impossible to use inside a tent, and don’t simmer. But nothing works as well in cold temperatures.
- Canister stoves. It can be challenging to use an Isobutane canister stove in the winter. The fuel loses its ability to flow the colder it becomes. The canister stoves that work the best in the winter don’t simmer well, like most white gas stoves. The main advantage of canister stoves is they are light and have the ability to be used inside a tent. Some integrated stove/pot systems have hanging kits that allow you to use them inside a tent even easier—though it can be dangerous.
It is also important to think about the food you’ll bring, as this will be your fuel for the next few days. For winter trips, prepackaged freeze dried meals for winter trips can be an easy packing alternative.

Basecamp in the snow backcountry snowshoeing skiing
Expert Advice
So now we have travel, shelter, sleeping and cooking systems. Here’s a typical rundown of events you can expect on your first backcountry skiing trip:
- Keep your days short and distances realistic. Even on skis, you’ll travel at a slower pace than in the summer, and your days are much shorter. Always try and find camp in the daylight and tamp down a spot to pitch your tent.
- Tent goes up first, and sleeping bag and pad are made ready. Take off your ski boots and start thinking about dinner.
- You don’t want to melt snow without a little starter water, so hopefully you saved a little water from the day. After enjoying hot food and drinks, make two more liters of boiling water and load a hot water bottle and slip them into your sleeping bag.
- Time to make sure your bladder is empty. If you haven’t already, dig a latrine and designate a pee spot.
- Take your ski boot liners out of the shells and place them inside your sleeping bag. We also recommend sleeping with any food that can’t freeze. Take off your socks and put on a dry pair, and then lay your damp socks on your chest to dry overnight.
- Using a hanging stove, grab some fresh snow and get it ready in the vestibule to make breakfast and hot drinks.
- After breakfast, boil two more litres of water and fill your hot water bottles, placing them into your ski boot liners, warming them up nicely. Once toasty, pull your boots on right away and begin taking camp apart.
- If you’re leaving camp set-up, you’ll need to build an ice locker to guard your food from animals. Another option is to take your food with you on your day trip, which is easy if your trip is short. You can sleep with your food, but don’t leave it in the tent during a day trip.
Winter Adventure Tips
Check out our series of articles on tips to have more adventures in winter!
Winter Adventure Tours
Looking to set out on an unforgettable winter holiday? Head over to our snow tours page to discover a wide range of winter-themed activities all over the globe!
Whether you are in search of snowshoeing tours, cross-country ski tours, ice climbing tours, or any other winter activity you can think of, we have the perfect winter adventure tour waiting for you!
Richard Campbell
Dec 2, 2022
Richard is the Founder of 10Adventures, and as a writer shares his experience from 30+ years exploring the world by foot, bike, ski, and boat.
Recent stories
Destinations
Peru Bike Tours: Best Cycling Routes and Trips for 2026
Peru bike tours are one of the most exciting ways to experience the Andes, Sacred Valley, Cusco, and Machu Picchu region.
Nadine Gravis
Jul 21, 2026
Destinations
Bike Tours in Vietnam – the Ultimate Cycling Adventure
Imagine pedalling through lush rice paddies, vibrant cities, and along scenic coastal roads with the wind in your hair and the sun on your face.
Alex Todd
Jul 20, 2026

Trip guides
The Ultimate Travel Guide to Victoria
The salty seaboard, lively harbour, and array of hiking and biking routes and trails etched along the shoreline, and surrounding mountainous region makes Victoria the ultimate Canadian island-getaway destination for families, outdoor lovers, and anyone and everyone.
Richard Campbell
Jul 19, 2026